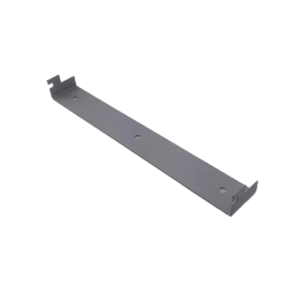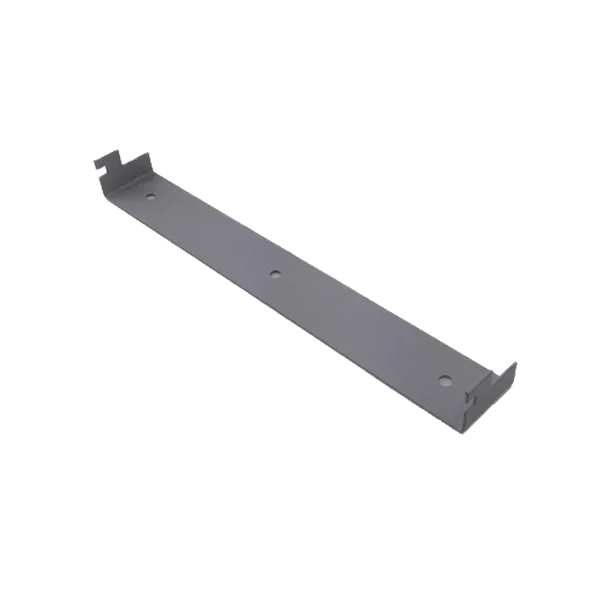
Zodiac wall mounting bracket with screw kit - R0740700
Zodiac wall mounting bracket with screw kit R0740700
The Zodiac wall mounting bracket with screw kit R0740700 is the original support used to fix Zodiac chlorinator control units securely to a wall.
It provides a stable mounting base for selected Zodiac control boxes, keeping the electronics safely positioned, well ventilated and easy to access
for day to day operation and maintenance.
Main features of the Zodiac wall mounting bracket
- Original Zodiac wall mounting bracket with matching screw and fixing kit.
- Designed to support compatible Zodiac salt chlorinator control units on a vertical wall.
- Provides a rigid, correctly spaced mounting point for the control box housing.
- Helps organise the technical room by keeping cables and equipment in a fixed position.
Technical details
- Brand: Zodiac
- Product type: Wall mounting bracket with screw kit
- Manufacturer reference: R0740700
- Function: Support and fixation of Zodiac chlorinator control units
- Kit contents: Wall bracket, mounting screws and basic wall fixings
- Typical installation area: Pool technical room or equipment area
- Mounting surface: Solid wall suitable for plugs and screws
Compatibility and applications
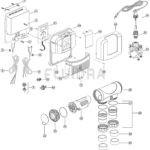
This wall mounting bracket is designed for use with specific Zodiac control boxes where the spare parts diagram lists R0740700 as the wall support.
It is used to mount the unit at the correct height and distance from the wall, preventing stress on the casing and cable entries.
- Suitable for selected Zodiac salt chlorinator control units that reference R0740700.
- Used when installing a new control box or relocating an existing chlorinator in the technical room.
- Recommended when the original bracket has been lost, damaged or incorrectly mounted.
Always check the identification label and exploded view of your chlorinator. If the wall support for your control unit is listed as R0740700,
this bracket and screw kit is the correct replacement.
When to replace the wall mounting bracket
The wall bracket is not a consumable, but it can be damaged by impact, incorrect installation or corrosion of screws in a humid environment.
A damaged support can affect the stability and safety of the control box.
- Replace the bracket if it is cracked, bent or deformed so that the control box no longer sits square.
- Replace the bracket if existing fixing points are worn or stripped and cannot hold the unit securely.
- Install a new kit when moving the chlorinator to a new wall or technical area.
- Use a fresh bracket and screw set if the old fixings are heavily corroded or seized.
Installation guidelines
Correct installation of the Zodiac wall mounting bracket R0740700 ensures that the control unit is stable, level and easy to operate.
Position the support so that the control panel is clearly visible and accessible, with enough clearance for cable routing and ventilation.
- Choose a solid, flat wall in a dry, ventilated technical room, away from direct water spray.
- Use the control box or the drilling template from the manual to mark the bracket fixing holes.
- Drill holes of the correct diameter for the supplied wall plugs and remove drilling dust.
- Insert the plugs, place the bracket and tighten the screws evenly until the support is firm.
- Hang the Zodiac control unit on the bracket and secure it according to the manufacturer instructions.
- Check that the unit is level, does not wobble and that all cables can be routed without strain.
Practical tips for a neat technical room
A properly installed wall bracket helps to create a tidy technical room, where equipment is easy to access and maintain.
Good cable management and clear spacing around the control box also support long term reliability of the electronics.
- Maintain a free space around the control box so the cover can open fully for service.
- Route cables along the wall using clips or conduits to avoid pulling on the connectors.
- Do not overload the bracket with extra equipment that it was not designed to carry.
- Inspect the bracket and screws at the start of each season and retighten if necessary.